I figured I should share this tip I learned today. Since a lot of my readers tend to come from the Awn forum, a lot of you probably use Awn, and maybe have tried some of the patches for Awn. Well because if using Awn I learned how to apply patches, but today I had to do something different, I needed to remove a patch, without starting from scratch.
So I asked around on the Awn forum and user, nablaa came to the rescue, by sharing this with me.
patch -p0 -R < name.patch
Just cd into the directory the patch is in then use that command and change name to the patches name, and just that patch will be removed. Then re-configure /compile and you will be all good. Thanks again to, nablaa for helpign me with this!
Monday, August 6, 2007
Quick tip for Patches


Streamy Update
A couple of weeks ago I made a non-linux related post about a new web start-up Streamy. Anywho there home page has recently changed and now they have a blog! So if you are interested you can now watch there feed, and see whats going on. I can't wait until I can actually get into streamy, but I do think it will prove useful and fun when reading all the Linux blogs. And yes I read other blogs other then my own....
Friday, August 3, 2007
Stock Screenlet
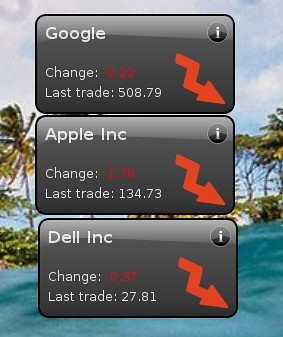
I was over at the screenlets website and I have recently been noticing a pick up in the amount of useful screenlets coming out. I just wanted to point out these stock screenlets:
The three companies I happen to choose, all are going down....But anywho back to the Screenlet. It is nice and simple looking, but at the moment it only has one theme, that black one you see in the screen shot. Lastly it is very easy to set up to certain stocks as long as you know the companies stock symbol. If there was one thing I woudl suggest it would be to have a symbol look up feature built in and maybe charts....ok that is two suggestions. And if you woudl like to get the screenlet go here.
Thursday, August 2, 2007
My Awn coverflow mock-up
I think it would be super cool if you took cover flow from itunes and smashed it into Awn! Basicly so you coudl use your scroll mouse to scroll through your launchers/open tasks on your dock. This would be good because you coudl hold many more things on your dock without it getting to wide. So here is my first mock-up ever:
So basically you can have how ever many icons you choose facing you. I have 3 in my mock-up facing you. Then all the rest are slanted at angles overlapping each other, on either sides of the icons facing you. Then the whole idea is to bring other ones to facing you, you just put your mouse over the dock and scroll with your scroll wheel. Anywho I posted about this in the Awn forum for further discussion if you interested.

Awn Manager Preview
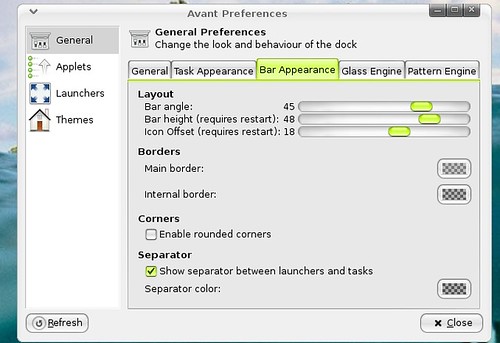
So maybe a week or so ago I posted about the Awn theme manager, which was still in early stages but was nice. Well it has made considerable progress, and is now not only a theme manager but pretty much all the preferences, in Awn. In this it now not only has the theme manager where you can install and save your themes, but you can also change you launcher order, and other Awn preferences all from one place. So now its time for a screen shot:
Now as you can see in the screen shot you have different categories listed on the left. The first one General is just like the preferences you would get if you were to right click Awn and click preferences, but this one is a little bit updated. The little update to the general section as you may be able to see in the picture is that you can adjust the bar angle, the bar height, and the icon offset.
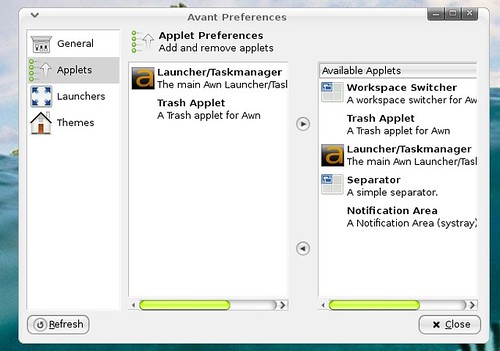
The next category on the left is applets, and it looks a little different then the one built in to awn, so here it is:
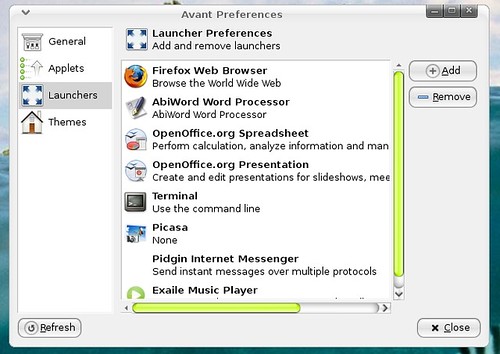
With the applets you just choose things from the right list and move them into the left list to get them on your Awn. The next catagory is the launchers section which actually is a bit innovative:
The great part about this launchers organizer is that you can drag the different launchers around in there, so there is no need like in the one built into Awn to click a launcher then use arrows to move it. Also I noticed after dragging an icon my dock automatically updated, so I did not have to hit the apply button to make it change my dock. There were to many times with the launcher organizer built into Awn when I organized all my icons then hit ok, without hitting the apply button and then I would need to start all over.
The last category in there is the theme manager which I wrote about in the last post. It pretty much looks the same and seems to act the same. But there may be a few bug fixes in there since the last one. The theme manager allows you to save and install themes from others. Here is a quick screen shot:
Well thats it for now on the Awn theme manager, go try it out!
Well I guess I should share how to get it....
Open a terminal and grab it with this command:

bzr co http://bazaar.launchpad.net/~awn-extras/awn-extras/trunk awn-extras
That will get you can awn-extra directory. Within the awn-extras directory navigate into the awn-manager directory and run the awnManager.py
Linux and Fonts
Ever since I started to use Linux I have always seen how to's on fixing the look of fonts. All of them claimed to make fonts look smoother and nicer. I never tried any of them because I thought, "my fonts look fine." Also I was to lazy to do any of the fixes....Anywho I came across a post today on an easy way to fix the fonts so I decided to give it a try. I got these instructions/shell script from this forum post. So basically go there and follow the instructions if you want to install it, there is no use on me repeating everything he wrote there, and it's simple enough.
So I followed it and it was fast and easy to install, but does it actually make your fonts look nicer is the question....So I decided to do a test. Before I installed it I took a screen shot of a paragraph from that post. Then after I installed it and restarted x I took another screen shot of the same paragraph. Here are my results:
Before font fix:
After Font Fix:
Now you you should probably click on the images or open them in a new Firefox tab to see them bigger and clearer to get the most accurate test results. But as far as I can see I do not see much of a difference if any.... But I would like to hear what you guys think? or perform your own tests and share with us how yours went.


Wednesday, August 1, 2007
Installing Rainlendar
Last post I did was a review of Rainlendar, and I said it could be a bit tricky to install cause it was a pain for me. Anywho when like I ever have problems I run to Qunu. On Qunu a nice person by the name of isaac_j87 was there to help me.... So here we go.
To install it normally, if you don't run into any problems you should first download it from here. After you download it you need to extract it, then you will have a directory called; "rainlendar2". In there there will be a file named, "rainlendar2". Now first try installing it, and see if it will work for you. To get it to run you just need to run the rainlendar2 file. Which I like to do from terminal so If it doesn't work I can see any errors. So I cd into the rainlendar2 directory then ran"
./rainlendar2
Now of course after I did this it did not work.....and I did not get any errors in my terminal output. So that is when I went to Qunu, and met isaac_j87 who I can not thank enough for helping me out!
So here is the fix for what went wrong with us. First you need to navigate to your home folder, and look in the directory called ".config" which is a hidden directory, so if you want to see it I know on Ubuntu you just pres, ctr+h on the keyboard while in your home directory and all your hidden files becoem visible. Now while in the ".config" directory you should see a ".rainlendar" directory if you already tried starting Rainlendar like I stated above. In this directory there should be a file or two called something like:
Rainlendar2-mike
and maybe;
Rainlendar2-root
Your first one probably ill not say mike, but your user name. Next make a copy of the Rainlendar2-"your user name" and paste it in the same directory as the other two. Next you will wan't to re-name the pasted file, "rainlendar2.ini". And make sure that is lowercase....
Now it should kind of work....So go back to the original Rainlendar2 directory and run the .bin again with ./rainlendar2 and you will probably get an error but the calendar should be working....the error I got was something like this (but if this does not happen scroll down and go to my note):
/home/mike/.config/.rainlendar/rainlendar2.ini', line 1: '=' expected.
So now lets fix this error. So type this into terminal but replace mike with your user name:
gedit /home/mike/.config/.rainlendar2
This will open gedit and you need to look at the text in this file. The second line of the file should say, [default] or something along those lines and right above it there should be a number....delete the number then save and close, and try running rainlendar again. Now it should work again but without that error. Congratulations you now have yourself a great desktop calendar to stay organized.
Note:
If you tried all of the above and it still didn't work your an unlucky fellow like I was. If after the file copy and name change it still doesn't run, then open up your .ini file in a text editor. See if it says anything... mine said this:
㘱㜶4
and nothing else....so after this we were stuck and I was frustrated so, I just opened up my .rainlendar directory and cleared all the contents...but make sure you are in the .rainlendar2 not the rainlendar2you want the one located in the .config directory. I just wiped out everything that was in it, so it was now just an empty directory. Then I tried running the ./rainlendar2 again in terminal and it then created the two files I mentioned before, and I copied it again and changed its name, and repeated all and bam it now worked! Go figure who know what happened....but it fixed it. If after all this it still don't work post a comment on your situation, and we can try and help you out.
Subscribe to:
Posts (Atom)